Ubuntu LinuxへのZabbix HTTPSのインストール
このチュートリアルでは、Ubuntu LinuxにHTTPSを使用してZabbix 4をインストールするために必要なすべての手順を説明します。
このチュートリアルでは、Let’s Encrypt – 無料のSSL / TLS証明書を使用します。
このチュートリアルはUbuntu 18.04でテストされました。
NTPを使用して日付と時刻を設定する
システムを正しい日付と時刻に保つことは非常に重要です。
正しいタイムゾーンを設定してください。
# dpkg-reconfigure tzdata
Ntpdateパッケージをインストールして正しい日付と時刻を設定します。
# apt-get update
# apt-get install ntpdate
# ntpdate pool.ntp.br
UbuntuのデフォルトのNTPクライアントを無効にします。
再起動後もコンピュータの日付と時刻を最新の状態に保つためにNTPサービスをインストールします。
# timedatectl set-ntp 0
# apt-get install ntp
コンピュータに正しい日付と時刻が設定されていることを確認してください。
# date
2. Ubuntu LinuxにMySQLをインストールする
Zabbixはすべての設定を保存するためにデータベースシステムを必要とします。
MySQLサーバーをインストールするには、Ubuntu APTコマンドを使用します。
# apt-get update
# apt-get install mysql-server mysql-client
MySQLサービスコンソールにアクセスするには、次のコマンドを使用します。
# mysql -u root -p
MySQLコンソールで、以下のタスクを実行する必要があります。
•zabbixという名前のデータベースを作成します。
•zabbixという名前のMySQLユーザーアカウントを作成します。
•zabbixデータベースをzabbixユーザーに完全に制御します。
CREATE DATABASE zabbix CHARACTER SET UTF8 COLLATE UTF8_BIN;
CREATE USER ‘zabbix’@’%’ IDENTIFIED BY ‘kamisama123’;
GRANT ALL PRIVILEGES ON zabbix.* TO ‘zabbix’@’%’;
quit;
Zabbixインストールパッケージをダウンロードしてデータベーステンプレートを入手してください。
# mkdir /downloads
# cd /downloads
# wget https://ufpr.dl.sourceforge.net/project/zabbix/ZABBIX%20Latest%20Stable/4.0.3/zabbix-4.0.3.tar.gz
Zabbixインストールパッケージを解凍します。
MySQLデータベース内のZabbixデータベーステンプレートをインポートします。
要求されたら、ZabbixユーザーのMySQLパスワードを入力する必要があります。
# tar -zxvf zabbix-4.0.3.tar.gz
# cd zabbix-4.0.3/database/mysql/
# mysql -u zabbix -p zabbix < schema.sql
# mysql -u zabbix -p zabbix < images.sql
# mysql -u zabbix -p zabbix < data.sql
Zabbixデータベースのインストールが完了しました。
3. Ubuntu LinuxにApacheをインストールする
Ubuntu APTコマンドを使用して、Apacheサーバーと必要なPHPモジュールをインストールします。
# apt-get install apache2 php7.2 php7.2-mysql libapache2-mod-php7.2
# apt-get install php7.2-mbstring php7.2-xml php7.2-gd
# apt-get install php7.2-curl php7.2-bcmath php7.2-ldap
Apache mod_sslを有効にします。
Apache mod_rewriteを有効にします。
apache2.confファイルを編集します。
# a2enmod ssl
# a2enmod rewrite
# vi /etc/apache2/apache2.conf
apache2.confの最後に次の行を追加してください。
<Directory /var/www/html>
AllowOverride All
</Directory>
システム上のPHP設定ファイルの場所を見つけます。
php.ini設定ファイルを編集します。
# updatedb
# locate php.ini
# vi /etc/php/7.2/apache2/php.ini
あなたのPHPのバージョンは私たちのものと同じではないかもしれません。
あなたのPHP設定ファイルの場所は私たちのものと同じではないかもしれません。
php.ini設定ファイルの以下の項目を修正します。
max_execution_time = 300
memory_limit = 256M
post_max_size = 32M
max_input_time = 300
date.timezone = America/Sao_Paulo
あなたのタイムゾーンは私たちのものと同じではないかもしれません。
Apache Webサーバーを手動で再起動します。
# service apache2 restart
# service apache2 status
Apacheサービスのステータスを確認してください。
● apache2.service – The Apache HTTP Server
Loaded: loaded (/lib/systemd/system/apache2.service; enabled)
Drop-In: /lib/systemd/system/apache2.service.d
└─apache2-systemd.conf
Active: active (running) since Mon 2018-12-03 03:41:12 -02; 2 days ago
Apacheサーバーのインストールは完了しました。
4. Apache仮想ホストの設定
1つのApacheサーバーが同じIPアドレスを使用して複数のWebサイトを提供できるようにする機能の場合は、仮想ホスト。
Apache VirtualHosts機能を使用するために必要なインフラストラクチャを作成しましょう。
# mkdir /websites/zabbix -p
# cd /websites/zabbix
# mkdir www logs
# chown www-data.www-data /websites -R
私たちのウェブサイトはzabbix.mining-pool.ninjaとなります。
zabbix.mining-pool.ninja Webサイトファイルは、/ Webサイト/ zabbix / wwwディレクトリ内にあります。
zabbix.mining-pool.ninjaログは/ website / zabbix / logsディレクトリ内に保存されます。
Alert!
You need to change the configuration files to reflect your Zabbix website name.
Zabbix WebサイトにApache Virtualhost設定ファイルを作成します。
# vi /etc/apache2/sites-available/zabbix.conf
これが私たちの設定ファイルです。
<VirtualHost *:80>
ServerAdmin nobody@care.com
DocumentRoot /websites/zabbix/www
ServerName zabbix.mining-pool.ninja
<Directory /websites/zabbix/www/>
Options Indexes FollowSymLinks
AllowOverride All
Require all granted
</Directory>
ErrorLog /websites/zabbix/logs/error.log
CustomLog /websites/zabbix/logs/access.log combined
LogLevel error
</VirtualHost>
Zabbix Virtualhost Webサイト設定ファイルを有効にします。
Apacheサービスを再起動します。
# a2ensite zabbix.conf
# service apache2 restart
これでApache VirtualHostsの設定は完了です。
5. DNSドメインレジストリを設定する
にアクセスする GODADDY DNSドメインを購入する。
この例では、MINING-POOL.NINJAというドメインを購入します。
あなたはDNSドメインを購入するために任意のウェブサイトを使用することができます、GoDaddyはちょうど私の個人的な選択です。
Zabbix WebサイトをApacheを実行しているコンピュータを指すDNSエントリを作成します。
この例では、IPアドレス34.217.177.160を指すZABBIX.MINING-POOL.NINJAを指すDNSエントリを作成しました。

DNS設定をテストするには、NSLOOKUPコマンドを使用します。
# apt-get update
# apt-get install dnsutils
# nslookup zabbix.mining-pool.ninja
Non-authoritative answer:
Name: zabbix.mining-pool.ninja
Address: 34.217.177.160
DNSドメインの設定が完了しました。
ブラウザを開き、WebサイトのHTTPバージョンにアクセスしてみます。
この例では、ブラウザに次のURLが入力されています。
•http://zabbix.mining-pool.ninja
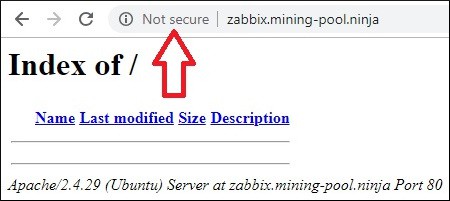
今、私たちは無料のHTTPS証明書をインストールする必要があります。
また、すべてのHTTPトラフィックをZabbix WebサイトのHTTPSバージョンに自動的にリダイレクトする必要があります。
6. Apacheで無料のHTTPS証明書を設定する
Ubuntu LinuxでLETのENCRYPTフリーSSL / TLS証明書を使用するために必要なパッケージをインストールします。
# apt-get install software-properties-common
# add-apt-repository universe
# add-apt-repository ppa:certbot/certbot
# apt-get update
# apt-get install python-certbot-apache
Apacheの無料HTTPS証明書を要求してインストールします。
# certbot –apache -d mining-pool.ninja
•(A)を押して利用規約に同意します。
•電子メールを共有してニュースレターを受信するには、(Y)を押します。
•(2)を押すと、HTTP Webサイトが自動的にHTTPSバージョンにリダイレクトされます。
Saving debug log to /var/log/letsencrypt/letsencrypt.log
Plugins selected: Authenticator apache, Installer apache
Enter email address (used for urgent renewal and security notices) (Enter ‘c’ to
cancel): techexpert.tips@gmail.com
– – – – – – – – – – – – – – – – – – – – – – – – – – – – – – – – – – – – – – – –
Please read the Terms of Service at
https://letsencrypt.org/documents/LE-SA-v1.2-November-15-2017.pdf. You must
agree in order to register with the ACME server at
https://acme-v02.api.letsencrypt.org/directory
– – – – – – – – – – – – – – – – – – – – – – – – – – – – – – – – – – – – – – – –
(A)gree/(C)ancel: A
– – – – – – – – – – – – – – – – – – – – – – – – – – – – – – – – – – – – – – – –
Would you be willing to share your email address with the Electronic Frontier
Foundation, a founding partner of the Let’s Encrypt project and the non-profit
organization that develops Certbot? We’d like to send you email about our work
encrypting the web, EFF news, campaigns, and ways to support digital freedom.
– – – – – – – – – – – – – – – – – – – – – – – – – – – – – – – – – – – – – – – –
(Y)es/(N)o: Y
Obtaining a new certificate
Performing the following challenges:
http-01 challenge for zabbix.mining-pool.ninja
Enabled Apache rewrite module
Waiting for verification…
Cleaning up challenges
Created an SSL vhost at /etc/apache2/sites-available/zabbix-le-ssl.conf
Enabled Apache socache_shmcb module
Enabled Apache ssl module
Deploying Certificate to VirtualHost /etc/apache2/sites-available/zabbix-le-ssl.conf
Enabling available site: /etc/apache2/sites-available/zabbix-le-ssl.conf
Please choose whether or not to redirect HTTP traffic to HTTPS, removing HTTP access.
– – – – – – – – – – – – – – – – – – – – – – – – – – – – – – – – – – – – – – – –
1: No redirect – Make no further changes to the webserver configuration.
2: Redirect – Make all requests redirect to secure HTTPS access. Choose this for
new sites, or if you’re confident your site works on HTTPS. You can undo this
change by editing your web server’s configuration.
– – – – – – – – – – – – – – – – – – – – – – – – – – – – – – – – – – – – – – – –
Select the appropriate number [1-2] then [enter] (press ‘c’ to cancel): 2
Enabled Apache rewrite module
Redirecting vhost in /etc/apache2/sites-enabled/zabbix.conf to ssl vhost in /etc/apache2/sites-available/zabbix-le-ssl.conf
– – – – – – – – – – – – – – – – – – – – – – – – – – – – – – – – – – – – – – – –
Congratulations! You have successfully enabled https://zabbix.mining-pool.ninja
You should test your configuration at:
https://www.ssllabs.com/ssltest/analyze.html?d=zabbix.mining-pool.ninja
– – – – – – – – – – – – – – – – – – – – – – – – – – – – – – – – – – – – – – – –
IMPORTANT NOTES:
– Congratulations! Your certificate and chain have been saved at:
/etc/letsencrypt/live/zabbix.mining-pool.ninja/fullchain.pem
Your key file has been saved at:
/etc/letsencrypt/live/zabbix.mining-pool.ninja/privkey.pem
Your cert will expire on 2019-04-09. To obtain a new or tweaked
version of this certificate in the future, simply run certbot again
with the “certonly” option. To non-interactively renew *all* of
your certificates, run “certbot renew”
– If you like Certbot, please consider supporting our work by:
Donating to ISRG / Let’s Encrypt: https://letsencrypt.org/donate
Donating to EFF: https://eff.org/donate-le
システムは自動的に無料の証明書を要求します。
また、すべてのHTTPアクセスをHTTPSバージョンのWebサイトにリダイレクトするようにApache Webサーバーを設定します。
この例では、システムはzabbix-le-ssl.confという名前のHTTPS仮想ホスト構成ファイルを作成しました。
これは、HTTPS仮想ホスト構成ファイルzabbix-le-ssl.confの内容です。
<IfModule mod_ssl.c>
<VirtualHost *:443>
ServerAdmin nobody@care.com
DocumentRoot /websites/zabbix/www
ServerName zabbix.mining-pool.ninja
<Directory /websites/zabbix/www/>
Options Indexes FollowSymLinks
AllowOverride All
Require all granted
</Directory>
ErrorLog /websites/zabbix/logs/error.log
CustomLog /websites/zabbix/logs/access.log combined
LogLevel error
SSLCertificateFile /etc/letsencrypt/live/zabbix.mining-pool.ninja/fullchain.pem
SSLCertificateKeyFile /etc/letsencrypt/live/zabbix.mining-pool.ninja/privkey.pem
Include /etc/letsencrypt/options-ssl-apache.conf
</VirtualHost>
</IfModule>
KEYファイルには証明書の秘密鍵が含まれており、常に安全な場所に保管する必要があります。
mining-pool.ninjaのキーファイルは/etc/letsencrypt/live/zabbix.mining-pool.ninja/privkey.pemに保存されていました。
システムは自動的に元のApache Virtualhost設定ファイルを変更します。
それは自動的にあなたのウェブサイトのHTTPS版にすべてのHTTP要求をリダイレクトします。
更新されたオリジナルのHTTP仮想ホスト構成ファイルzabbix.confの内容は次のとおりです。
<VirtualHost *:80>
ServerAdmin nobody@care.com
DocumentRoot /websites/zabbix/www
ServerName zabbix.mining-pool.ninja
<Directory /websites/zabbix/www/>
Options Indexes FollowSymLinks
AllowOverride All
Require all granted
</Directory>
ErrorLog /websites/zabbix/logs/error.log
CustomLog /websites/zabbix/logs/access.log combined
LogLevel error
RewriteEngine on
RewriteCond %{SERVER_NAME} =zabbix.mining-pool.ninja
RewriteRule ^ https://%{SERVER_NAME}%{REQUEST_URI} [END,NE,R=permanent]
</VirtualHost>
7. Apacheで無料のHTTPS証明書をテストする
必要な設定はすべて完了しました。
設定をテストする時が来ました。
ブラウザを開き、WebサイトのHTTPバージョンにアクセスしてみます。
この例では、ブラウザに次のURLが入力されています。
•http://zabbix.mining-pool.ninja
Apacheは自動的にHTTPリクエストをあなたのウェブサイトのHTTPSバージョンにリダイレクトします。
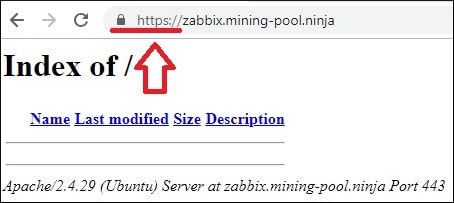
これでApache HTTPSの無料証明書の設定は完了です。
8. Ubuntu LinuxにZabbix 4をインストールする
MySQLとApacheの設定が終わったら、Zabbixのインストールを始めましょう。
Zabbixサービスに必要なユーザーアカウントを作成します。
# groupadd zabbix
# useradd -g zabbix -s /bin/bash zabbix
必要なパッケージをインストールするには、Ubuntu APTコマンドを使用します。
# apt-get install build-essential libmysqlclient-dev libssl-dev libsnmp-dev libevent-dev
# apt-get install libopenipmi-dev libcurl4-openssl-dev libxml2-dev libssh2-1-dev libpcre3-dev
# apt-get install libldap2-dev libiksemel-dev libcurl4-openssl-dev libgnutls28-dev
Zabbixインストールパッケージがダウンロードされたディレクトリにアクセスします。
Zabbixサーバーアプリケーションをコンパイルしてインストールします。
# cd /downloads/zabbix-4.0.3/
# ./configure –enable-server –enable-agent –with-mysql –with-openssl –with-net-snmp –with-openipmi –with-libcurl –with-libxml2 –with-ssh2 –with-ldap
# make
# make install
システム上のZabbixサーバー設定ファイルの場所を見つけます。
zabbix_server.conf構成ファイルを編集します。
# updatedb
# locate zabbix_server.conf
# vi /usr/local/etc/zabbix_server.conf
これが私たちの設定の前の、元のファイルです。
LogFile=/tmp/zabbix_server.log
DBName=zabbix
DBUser=zabbix
Timeout=4
LogSlowQueries=3000
これが私たちの設定による新しいファイルです。
LogFile=/tmp/zabbix_server.log
DBHost=localhost
DBName=zabbix
DBUser=zabbix
DBPassword=kamisama123
Timeout=4
LogSlowQueries=3000
次のコマンドを使用してZabbixサーバーを起動します。
# /usr/local/sbin/zabbix_server
次のコマンドを使用してZabbixエージェントアプリケーションを起動します。
# /usr/local/sbin/zabbix_agentd
オプション! Zabbixインストールパッケージはサービス起動スクリプトを提供します。
Zabbix起動スクリプトをコピーします。
# cd /downloads/zabbix-4.0.3/
# cp misc/init.d/debian/* /etc/init.d/
これで、Zabbixサーバーサービスを開始するために次のコマンドを使用できます。
# /etc/init.d/zabbix-server start
次のコマンドを使ってZabbixサーバーサービスを停止できます。
# /etc/init.d/zabbix-server stop
ZabbixフロントエンドファイルをApacheのルートドライブディレクトリに移動します。
www-dataユーザーにZabbixディレクトリとそのファイルを完全に制御させます。
# cd /downloads/zabbix-4.0.3/frontends
# cp php/* /websites/zabbix/www/ -R
# chown www-data.www-data /websites/zabbix/www -R
Apacheサービスを再起動します。
# service apache2 stop
# service apache2 start
9. Ubuntu LinuxでZabbixを設定する
ブラウザを開き、Zabbix WebサイトのHTTPSバージョンにアクセスします。
この例では、ブラウザに次のURLが入力されています。
•https://zabbix.mining-pool.ninja
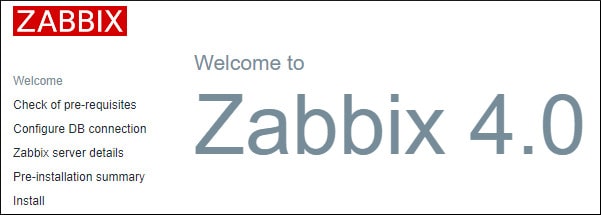
Zabbixのインストールウィザードが表示されます。
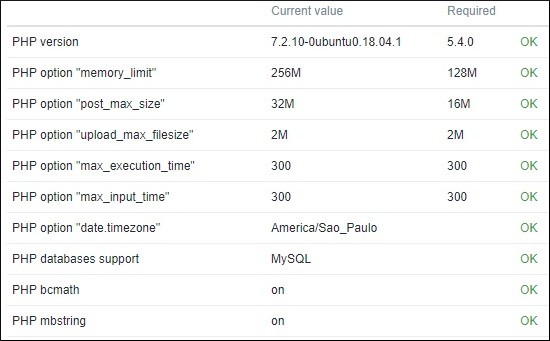
Zabbixのすべての要件が正常に満たされたかどうかを確認します。
Zabbixデータベースへの接続に必要なMySQLログイン情報を入力してください
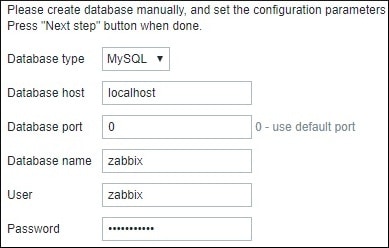
Nextボタンをクリックしてください。

Zabbixインストールの概要を確認してください。
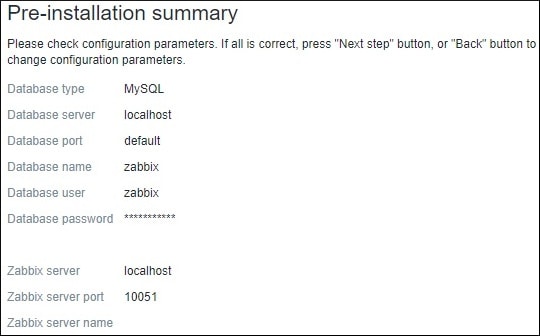
[完了]ボタンをクリックしてZabbixログイン画面にアクセスします。

Zabbixログイン画面で、以下の情報を入力します。
•Zabbixのデフォルトのユーザー名:Admin
•Zabbixのデフォルトパスワード:zabbix
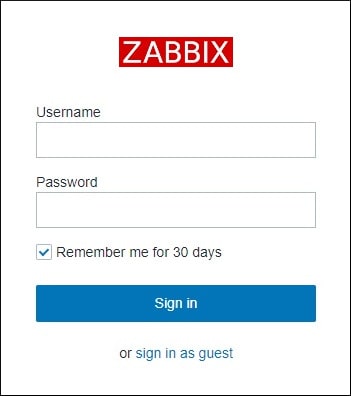
ログインに成功すると、Zabbixダッシュボードが表示されます。
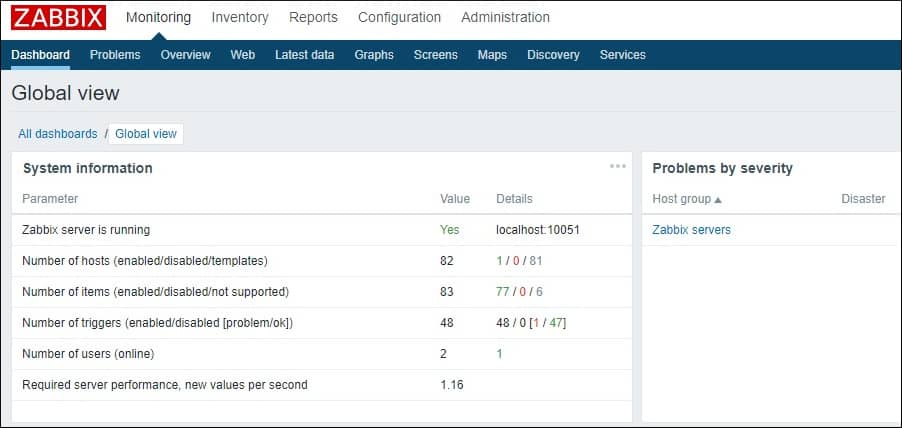
おめでとうございます、Zabbixがあなたのシステムにインストールされました。
10. Zabbixサーバーを監視する
Zabbixサーバーは自分自身を監視できなければなりません。
Zabbixダッシュボードで、[設定]メニューにアクセスして[ホスト]オプションを選択します。

画面右上で、Zabbixサーバというオプションを選択します。
Zabbixサーバーという名前のホストを見つけて、「無効」という単語をクリックします。
これにより、Zabbixサーバーは自分自身を監視できます。

Zabbixサーバーのステータスが「無効」から「有効」に変わります。

Zabbixサーバーは現在自分自身を監視しています。
11.無料のHTTPS証明書を更新する方法
LET’S ENCRYPT無料SSL / TLS証明書は90日間有効です。
システムは、有効期限が切れてから30日以内に証明書を自動的に更新するスケジュールされたタスクを作成します。
スケジュールされたタスク名はcertbotで、ディレクトリ/etc/cron.dの中にあります。
これは/etc/cron.d/certbotファイルの内容です。
# /etc/cron.d/certbot: crontab entries for the certbot package
#
# Upstream recommends attempting renewal twice a day
#
# Eventually, this will be an opportunity to validate certificates
# haven’t been revoked, etc. Renewal will only occur if expiration
# is within 30 days.
#
# Important Note! This cronjob will NOT be executed if you are
# running systemd as your init system. If you are running systemd,
# the cronjob.timer function takes precedence over this cronjob. For
# more details, see the systemd.timer manpage, or use systemctl show
# certbot.timer.
SHELL=/bin/sh
PATH=/usr/local/sbin:/usr/local/bin:/sbin:/bin:/usr/sbin:/usr/bin
0 */12 * * * root test -x /usr/bin/certbot -a \! -d /run/systemd/system && perl -e ‘sleep int(rand(43200))’ && certbot -q renew
証明書の更新プロセスをシミュレートするには、次のコマンドを使用します。
# certbot renew –dry-run
次のようなメッセージが表示されます。
Saving debug log to /var/log/letsencrypt/letsencrypt.log
– – – – – – – – – – – – – – – – – – – – – – – – – – – – – – – – – – – – – – – –
Processing /etc/letsencrypt/renewal/zabbix.mining-pool.ninja.conf
– – – – – – – – – – – – – – – – – – – – – – – – – – – – – – – – – – – – – – – –
Cert not due for renewal, but simulating renewal for dry run
Plugins selected: Authenticator apache, Installer apache
Renewing an existing certificate
Performing the following challenges:
http-01 challenge for zabbix.mining-pool.ninja
Waiting for verification…
Cleaning up challenges
– – – – – – – – – – – – – – – – – – – – – – – – – – – – – – – – – – – – – – – –
new certificate deployed with reload of apache server; fullchain is
/etc/letsencrypt/live/zabbix.mining-pool.ninja/fullchain.pem
– – – – – – – – – – – – – – – – – – – – – – – – – – – – – – – – – – – – – – – –
– – – – – – – – – – – – – – – – – – – – – – – – – – – – – – – – – – – – – – – –
** DRY RUN: simulating ‘certbot renew’ close to cert expiry
** (The test certificates below have not been saved.)
Congratulations, all renewals succeeded. The following certs have been renewed:
/etc/letsencrypt/live/zabbix.mining-pool.ninja/fullchain.pem (success)
** DRY RUN: simulating ‘certbot renew’ close to cert expiry
** (The test certificates above have not been saved.)
– – – – – – – – – – – – – – – – – – – – – – – – – – – – – – – – – – – – – – – –
IMPORTANT NOTES:
– Your account credentials have been saved in your Certbot
configuration directory at /etc/letsencrypt. You should make a
secure backup of this folder now. This configuration directory will
also contain certificates and private keys obtained by Certbot so
making regular backups of this folder is ideal.

Leave A Comment
You must be logged in to post a comment.