Zabbix HTTPS Installation on Ubuntu Linux
This tutorial will show you all the steps required to install Zabbix 4 using HTTPS on Ubuntu Linux.
This tutorial will use Let’s Encrypt – Free SSL/TLS Certificates.
This tutorial was tested on Ubuntu 18.04.
Table of Contents
- Configure Date and Time using NTP
- Install MySQL on Ubuntu Linux
- Install Apache on Ubuntu Linux
- Configuring Apache Virtual Hosts
- Configure the DNS Domain Registry
- Configure the Free HTTPS Certificate on Apache
- Testing the Free HTTPS Certificate on Apache
- Install Zabbix 4 on Ubuntu Linux
- Configure Zabbix on Ubuntu Linux
- Monitor the Zabbix Server
- How to Renew The Free HTTPS Certificate
1. Configure Date and Time using NTP
It is very important to keep your system with the correct date and time.
Set the correct timezone.
# dpkg-reconfigure tzdata
Install the Ntpdate package and set the correct date and time.
# apt-get update
# apt-get install ntpdate
# ntpdate pool.ntp.br
Disable the Ubuntu default NTP client.
Install the NTP service to keep the computer date and time updated after a reboot.
# timedatectl set-ntp 0
# apt-get install ntp
Make sure the correct date and time have been set on your computer.
# date
2. Install MySQL on Ubuntu Linux
Zabbix requires a database system to store all its configuration.
Use the Ubuntu APT command to install the MySQL server.
# apt-get update
# apt-get install mysql-server mysql-client
Use the following command to access the MySQL service console.
# mysql -u root -p
On the MySQL console, you need to perform the following tasks:
• Create a database named zabbix.
• Create a MySQL user account named zabbix.
• Give full control over the zabbix database to the zabbix user.
CREATE DATABASE zabbix CHARACTER SET UTF8 COLLATE UTF8_BIN;
CREATE USER ‘zabbix’@’%’ IDENTIFIED BY ‘kamisama123’;
GRANT ALL PRIVILEGES ON zabbix.* TO ‘zabbix’@’%’;
quit;
Download the Zabbix installation package to get the database templates.
# mkdir /downloads
# cd /downloads
# wget https://ufpr.dl.sourceforge.net/project/zabbix/ZABBIX%20Latest%20Stable/4.0.3/zabbix-4.0.3.tar.gz
Extract the Zabbix installation package.
Import the Zabbix database templates inside the MySQL database.
When asked, you need to enter the MySQL password for the Zabbix user.
# tar -zxvf zabbix-4.0.3.tar.gz
# cd zabbix-4.0.3/database/mysql/
# mysql -u zabbix -p zabbix < schema.sql
# mysql -u zabbix -p zabbix < images.sql
# mysql -u zabbix -p zabbix < data.sql
The Zabbix database installation was completed.
3. Install Apache on Ubuntu Linux
Use the Ubuntu APT command to install the Apache server and the required PHP modules.
# apt-get install apache2 php7.2 php7.2-mysql libapache2-mod-php7.2
# apt-get install php7.2-mbstring php7.2-xml php7.2-gd
# apt-get install php7.2-curl php7.2-bcmath php7.2-ldap
Enable Apache mod_ssl.
Enable Apache mod_rewrite.
Edit the apache2.conf file.
# a2enmod ssl
# a2enmod rewrite
# vi /etc/apache2/apache2.conf
Add the following lines at the end of apache2.conf
<Directory /var/www/html>
AllowOverride All
</Directory>
Find the location of the PHP configuration file on your system.
Edit the php.ini configuration file.
# updatedb
# locate php.ini
# vi /etc/php/7.2/apache2/php.ini
Your PHP version may not be the same as ours.
Your PHP configuration file location may not be the same as ours.
Modify the following items in the php.ini configuration file.
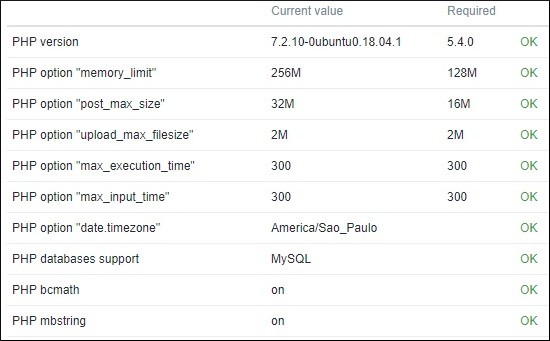
max_execution_time = 300
memory_limit = 256M
post_max_size = 32M
max_input_time = 300
date.timezone = America/Sao_Paulo
Your timezone may not be the same as ours.
Restart the Apache web server manually.
# service apache2 restart
# service apache2 status
Verify the Apache service status.
● apache2.service – The Apache HTTP Server
Loaded: loaded (/lib/systemd/system/apache2.service; enabled)
Drop-In: /lib/systemd/system/apache2.service.d
└─apache2-systemd.conf
Active: active (running) since Mon 2018-12-03 03:41:12 -02; 2 days ago
The Apache server installation was completed.
4. Configuring Apache Virtual Hosts
Virtual Hosts if a feature that allows one Apache server to offer multiple websites using the same IP address.
Lets’ create the necessary infrastructure to use the Apache VirtualHosts feature.
# mkdir /websites/zabbix -p
# cd /websites/zabbix
# mkdir www logs
# chown www-data.www-data /websites -R
Our website will be named zabbix.mining-pool.ninja.
The zabbix.mining-pool.ninja website files should be inside the /websites/zabbix/www directory.
The zabbix.mining-pool.ninja logs will be stored inside the /websites/zabbix/logs directory.
Alert!
You need to change the configuration files to reflect your Zabbix website name.
Create an Apache Virtualhost configuration file to your Zabbix website.
# vi /etc/apache2/sites-available/zabbix.conf
Here is the file with our configuration.
<VirtualHost *:80>
ServerAdmin nobody@care.com
DocumentRoot /websites/zabbix/www
ServerName zabbix.mining-pool.ninja
<Directory /websites/zabbix/www/>
Options Indexes FollowSymLinks
AllowOverride All
Require all granted
</Directory>
ErrorLog /websites/zabbix/logs/error.log
CustomLog /websites/zabbix/logs/access.log combined
LogLevel error
</VirtualHost>
Enable your Zabbix Virtualhost Website configuration file.
Restart the Apache service.
# a2ensite zabbix.conf
# service apache2 restart
You finished the Apache VirtualHosts configuration.
5. Configure the DNS Domain Registry
Access the GODADDY WEBSITE and purchase a DNS domain.
In our example, we purchase the domain named MINING-POOL.NINJA.
You can use any website to purchase a DNS domain, GoDaddy is just my personal choice.
Create a DNS entry pointing your Zabbix website to the computer running Apache.
In our example, we created a DNS entry pointing ZABBIX.MINING-POOL.NINJA to the IP address 34.217.177.160.

Use the NSLOOKUP command to test your DNS configuration
# apt-get update
# apt-get install dnsutils
# nslookup zabbix.mining-pool.ninja
Non-authoritative answer:
Name: zabbix.mining-pool.ninja
Address: 34.217.177.160
You finished the DNS domain configuration.
Open your browser and try to access the HTTP version of your website.
In our example, the following URL was entered in the Browser:
• http://zabbix.mining-pool.ninja
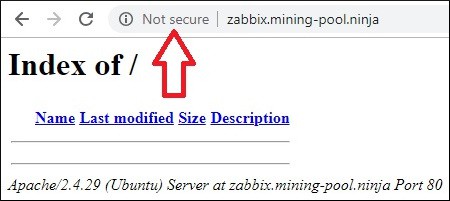
Now, we need to install the free HTTPS certificate.
We also need to redirect all HTTP traffic to the HTTPS version of our Zabbix website automatically.
6. Configure the Free HTTPS Certificate on Apache
Install the required packages to use the LET’S ENCRYPT Free SSL/TLS Certificates on Ubuntu Linux.
# apt-get install software-properties-common
# add-apt-repository universe
# add-apt-repository ppa:certbot/certbot
# apt-get update
# apt-get install python-certbot-apache
Request and install the Apache free HTTPS certificate.
# certbot –apache -d mining-pool.ninja
• Press (A) to Agree with the Terms of Service.
• Press (Y) to share your e-mail and receive Newsletters.
• Press (2) to automatically redirect your HTTP website to the HTTPS versions.
Saving debug log to /var/log/letsencrypt/letsencrypt.log
Plugins selected: Authenticator apache, Installer apache
Enter email address (used for urgent renewal and security notices) (Enter ‘c’ to
cancel): techexpert.tips@gmail.com
– – – – – – – – – – – – – – – – – – – – – – – – – – – – – – – – – – – – – – – –
Please read the Terms of Service at
https://letsencrypt.org/documents/LE-SA-v1.2-November-15-2017.pdf. You must
agree in order to register with the ACME server at
https://acme-v02.api.letsencrypt.org/directory
– – – – – – – – – – – – – – – – – – – – – – – – – – – – – – – – – – – – – – – –
(A)gree/(C)ancel: A
– – – – – – – – – – – – – – – – – – – – – – – – – – – – – – – – – – – – – – – –
Would you be willing to share your email address with the Electronic Frontier
Foundation, a founding partner of the Let’s Encrypt project and the non-profit
organization that develops Certbot? We’d like to send you email about our work
encrypting the web, EFF news, campaigns, and ways to support digital freedom.
– – – – – – – – – – – – – – – – – – – – – – – – – – – – – – – – – – – – – – – –
(Y)es/(N)o: Y
Obtaining a new certificate
Performing the following challenges:
http-01 challenge for zabbix.mining-pool.ninja
Enabled Apache rewrite module
Waiting for verification…
Cleaning up challenges
Created an SSL vhost at /etc/apache2/sites-available/zabbix-le-ssl.conf
Enabled Apache socache_shmcb module
Enabled Apache ssl module
Deploying Certificate to VirtualHost /etc/apache2/sites-available/zabbix-le-ssl.conf
Enabling available site: /etc/apache2/sites-available/zabbix-le-ssl.conf
Please choose whether or not to redirect HTTP traffic to HTTPS, removing HTTP access.
– – – – – – – – – – – – – – – – – – – – – – – – – – – – – – – – – – – – – – – –
1: No redirect – Make no further changes to the webserver configuration.
2: Redirect – Make all requests redirect to secure HTTPS access. Choose this for
new sites, or if you’re confident your site works on HTTPS. You can undo this
change by editing your web server’s configuration.
– – – – – – – – – – – – – – – – – – – – – – – – – – – – – – – – – – – – – – – –
Select the appropriate number [1-2] then [enter] (press ‘c’ to cancel): 2
Enabled Apache rewrite module
Redirecting vhost in /etc/apache2/sites-enabled/zabbix.conf to ssl vhost in /etc/apache2/sites-available/zabbix-le-ssl.conf
– – – – – – – – – – – – – – – – – – – – – – – – – – – – – – – – – – – – – – – –
Congratulations! You have successfully enabled https://zabbix.mining-pool.ninja
You should test your configuration at:
https://www.ssllabs.com/ssltest/analyze.html?d=zabbix.mining-pool.ninja
– – – – – – – – – – – – – – – – – – – – – – – – – – – – – – – – – – – – – – – –
IMPORTANT NOTES:
– Congratulations! Your certificate and chain have been saved at:
/etc/letsencrypt/live/zabbix.mining-pool.ninja/fullchain.pem
Your key file has been saved at:
/etc/letsencrypt/live/zabbix.mining-pool.ninja/privkey.pem
Your cert will expire on 2019-04-09. To obtain a new or tweaked
version of this certificate in the future, simply run certbot again
with the “certonly” option. To non-interactively renew *all* of
your certificates, run “certbot renew”
– If you like Certbot, please consider supporting our work by:
Donating to ISRG / Let’s Encrypt: https://letsencrypt.org/donate
Donating to EFF: https://eff.org/donate-le
The system will automatically request the free certificate.
It will also configure your Apache web server to redirect all HTTP access to the HTTPS version of your website.
In our example, the system created an HTTPS Virtualhost configuration file named zabbix-le-ssl.conf.
Here is the content of the HTTPS Virtualhost configuration file zabbix-le-ssl.conf:
<IfModule mod_ssl.c>
<VirtualHost *:443>
ServerAdmin nobody@care.com
DocumentRoot /websites/zabbix/www
ServerName zabbix.mining-pool.ninja
<Directory /websites/zabbix/www/>
Options Indexes FollowSymLinks
AllowOverride All
Require all granted
</Directory>
ErrorLog /websites/zabbix/logs/error.log
CustomLog /websites/zabbix/logs/access.log combined
LogLevel error
SSLCertificateFile /etc/letsencrypt/live/zabbix.mining-pool.ninja/fullchain.pem
SSLCertificateKeyFile /etc/letsencrypt/live/zabbix.mining-pool.ninja/privkey.pem
Include /etc/letsencrypt/options-ssl-apache.conf
</VirtualHost>
</IfModule>
The KEY file contains your Certificate private key and must be kept in a safe place all the time.
The key file to mining-pool.ninja was stored at /etc/letsencrypt/live/zabbix.mining-pool.ninja/privkey.pem.
The system automatically modifies the original Apache Virtualhost configuration file.
It will automatically redirect all HTTP requests to the HTTPS version of your website.
Here is the content of the updated original HTTP Virtualhost configuration file, zabbix.conf:
<VirtualHost *:80>
ServerAdmin nobody@care.com
DocumentRoot /websites/zabbix/www
ServerName zabbix.mining-pool.ninja
<Directory /websites/zabbix/www/>
Options Indexes FollowSymLinks
AllowOverride All
Require all granted
</Directory>
ErrorLog /websites/zabbix/logs/error.log
CustomLog /websites/zabbix/logs/access.log combined
LogLevel error
RewriteEngine on
RewriteCond %{SERVER_NAME} =zabbix.mining-pool.ninja
RewriteRule ^ https://%{SERVER_NAME}%{REQUEST_URI} [END,NE,R=permanent]
</VirtualHost>
7. Testing the Free HTTPS Certificate on Apache
All the configuration required is done.
It is time to test your configuration.
Open your browser and try to access the HTTP version of your website.
In our example, the following URL was entered in the Browser:
• http://zabbix.mining-pool.ninja
Apache will automatically redirect the HTTP request to the HTTPS version of your website.
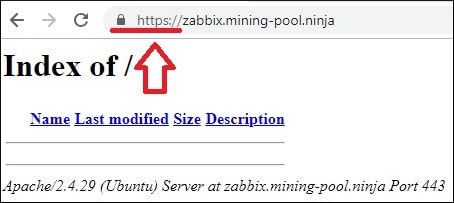
You finished the Apache HTTPS free certificate configuration.
8. Install Zabbix 4 on Ubuntu Linux
After finishing the MySQL and the Apache configuration, we can start the Zabbix installation.
Create the required a user account to the Zabbix service.
# groupadd zabbix
# useradd -g zabbix -s /bin/bash zabbix
Use the Ubuntu APT command to install the required packages.
# apt-get install build-essential libmysqlclient-dev libssl-dev libsnmp-dev libevent-dev
# apt-get install libopenipmi-dev libcurl4-openssl-dev libxml2-dev libssh2-1-dev libpcre3-dev
# apt-get install libldap2-dev libiksemel-dev libcurl4-openssl-dev libgnutls28-dev
Access the directory where the Zabbix installation package was downloaded.
Compile and install the Zabbix server application.
# cd /downloads/zabbix-4.0.3/
# ./configure –enable-server –enable-agent –with-mysql –with-openssl –with-net-snmp –with-openipmi –with-libcurl –with-libxml2 –with-ssh2 –with-ldap
# make
# make install
Find the location of the Zabbix server configuration file on your system.
Edit the zabbix_server.conf configuration file.
# updatedb
# locate zabbix_server.conf
# vi /usr/local/etc/zabbix_server.conf
Here is the original file, before our configuration.
LogFile=/tmp/zabbix_server.log
DBName=zabbix
DBUser=zabbix
Timeout=4
LogSlowQueries=3000
Here is the new file with our configuration.
LogFile=/tmp/zabbix_server.log
DBHost=localhost
DBName=zabbix
DBUser=zabbix
DBPassword=kamisama123
Timeout=4
LogSlowQueries=3000
Start the Zabbix server using the following command.
# /usr/local/sbin/zabbix_server
Start the Zabbix agent application using the following command.
# /usr/local/sbin/zabbix_agentd
Optional! The Zabbix installation package offers service startup scripts.
Copy the Zabbix startup script.
# cd /downloads/zabbix-4.0.3/
# cp misc/init.d/debian/* /etc/init.d/
You can now use the following commands to start the Zabbix server service.
# /etc/init.d/zabbix-server start
You can now use the following commands to stop the Zabbix server service.
# /etc/init.d/zabbix-server stop
Move the Zabbix frontend files inside your Apache root drive directory.
Give the www-data user full control over the Zabbix directory and its files.
# cd /downloads/zabbix-4.0.3/frontends
# cp php/* /websites/zabbix/www/ -R
# chown www-data.www-data /websites/zabbix/www -R
Restart the Apache service.
# service apache2 stop
# service apache2 start
9. Configure Zabbix on Ubuntu Linux
Open your browser and access the HTTPS version of your Zabbix website.
In our example, the following URL was entered in the Browser:
• https://zabbix.mining-pool.ninja
The Zabbix installation wizard will be presented.
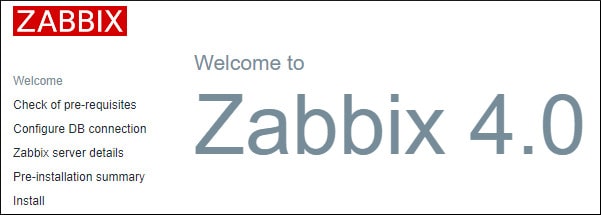
Verify if all Zabbix requirements were met successfully.
Enter the MySQL login information required to connect to the Zabbix database
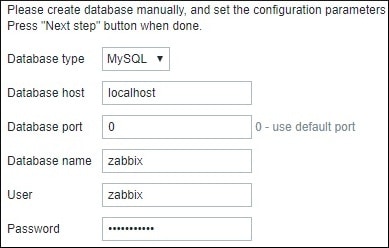
Click on the Next button.

Verify the Zabbix installation summary.
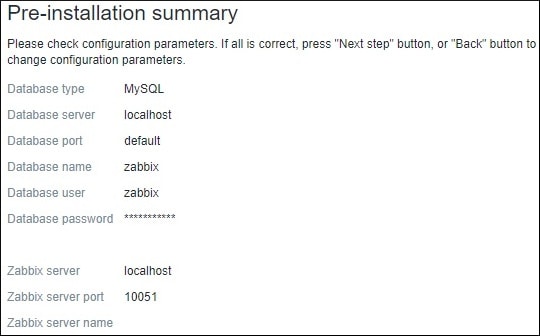
Click on the Finish button to access the Zabbix Login screen.

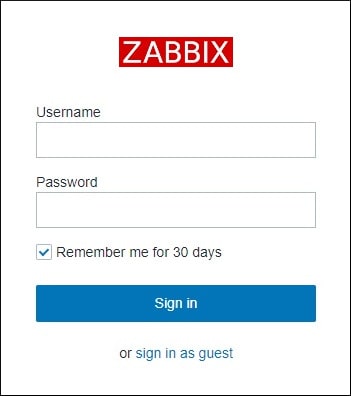
On the Zabbix logins screen, enter the following information.
• Zabbix default username: Admin
• Zabbix default Password: zabbix
After a successful login, The Zabbix dashboard will be displayed.
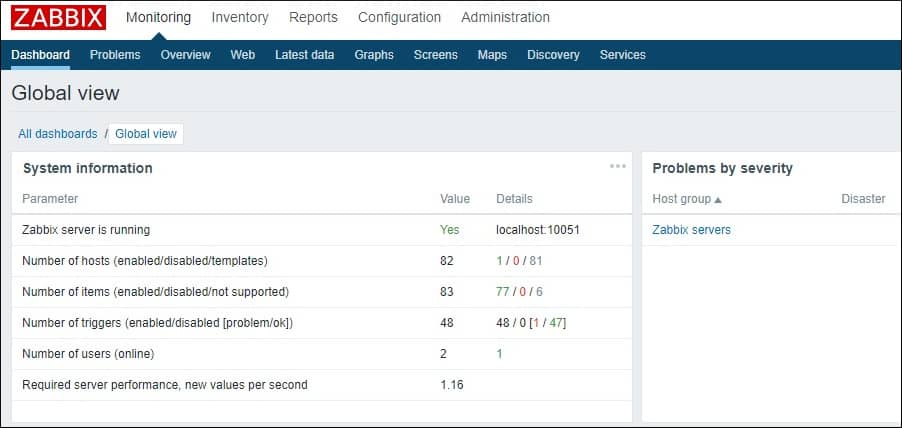
Congratulations, Zabbix is installed on your system.
10. Monitor the Zabbix Server
The Zabbix server must be able to monitor itself.
On the Zabbix dashboard, access the Configuration menu and select the Host option.

On the top right of the screen, select the option named: Zabbix servers
Locate the host named Zabbix server and click on the word DISABLED.
This will enable the Zabbix server to monitor itself.

The Zabbix server status will turn from DISABLED to ENABLED.

The Zabbix server is now monitoring itself.
11. How to Renew The Free HTTPS Certificate
The LET’S ENCRYPT Free SSL/TLS Certificates is valid only for 90 days.
The System creates a scheduled task to automatically renew any certificate within thirty days of expiration.
The scheduled task name is certbot and it is located inside the directory /etc/cron.d.
Here is the content of the /etc/cron.d/certbot file:
# /etc/cron.d/certbot: crontab entries for the certbot package
#
# Upstream recommends attempting renewal twice a day
#
# Eventually, this will be an opportunity to validate certificates
# haven’t been revoked, etc. Renewal will only occur if expiration
# is within 30 days.
#
# Important Note! This cronjob will NOT be executed if you are
# running systemd as your init system. If you are running systemd,
# the cronjob.timer function takes precedence over this cronjob. For
# more details, see the systemd.timer manpage, or use systemctl show
# certbot.timer.
SHELL=/bin/sh
PATH=/usr/local/sbin:/usr/local/bin:/sbin:/bin:/usr/sbin:/usr/bin
0 */12 * * * root test -x /usr/bin/certbot -a \! -d /run/systemd/system && perl -e ‘sleep int(rand(43200))’ && certbot -q renew
Use the following command to simulate the process of certificate renew.
# certbot renew –dry-run
You should see the following messages:
Saving debug log to /var/log/letsencrypt/letsencrypt.log
– – – – – – – – – – – – – – – – – – – – – – – – – – – – – – – – – – – – – – – –
Processing /etc/letsencrypt/renewal/zabbix.mining-pool.ninja.conf
– – – – – – – – – – – – – – – – – – – – – – – – – – – – – – – – – – – – – – – –
Cert not due for renewal, but simulating renewal for dry run
Plugins selected: Authenticator apache, Installer apache
Renewing an existing certificate
Performing the following challenges:
http-01 challenge for zabbix.mining-pool.ninja
Waiting for verification…
Cleaning up challenges
– – – – – – – – – – – – – – – – – – – – – – – – – – – – – – – – – – – – – – – –
new certificate deployed with reload of apache server; fullchain is
/etc/letsencrypt/live/zabbix.mining-pool.ninja/fullchain.pem
– – – – – – – – – – – – – – – – – – – – – – – – – – – – – – – – – – – – – – – –
– – – – – – – – – – – – – – – – – – – – – – – – – – – – – – – – – – – – – – – –
** DRY RUN: simulating ‘certbot renew’ close to cert expiry
** (The test certificates below have not been saved.)
Congratulations, all renewals succeeded. The following certs have been renewed:
/etc/letsencrypt/live/zabbix.mining-pool.ninja/fullchain.pem (success)
** DRY RUN: simulating ‘certbot renew’ close to cert expiry
** (The test certificates above have not been saved.)
– – – – – – – – – – – – – – – – – – – – – – – – – – – – – – – – – – – – – – – –
IMPORTANT NOTES:
– Your account credentials have been saved in your Certbot
configuration directory at /etc/letsencrypt. You should make a
secure backup of this folder now. This configuration directory will
also contain certificates and private keys obtained by Certbot so
making regular backups of this folder is ideal.

Leave A Comment
You must be logged in to post a comment.