在Ubuntu Linux上安装Zabbix HTTPS
本教程将向您展示在Ubuntu Linux上使用HTTPS安装Zabbix 4所需的所有步骤。
本教程将使用Let的加密 – 免费的SSL / TLS证书。
本教程在Ubuntu 18.04上进行了测试。
1.使用NTP配置日期和时间
保持系统正确的日期和时间非常重要。
设置正确的时区
# dpkg-reconfigure tzdata
安装Ntpdate包并设置正确的日期和时间。
# apt-get update
# apt-get install ntpdate
# ntpdate pool.ntp.br
禁用Ubuntu默认NTP客户端。
安装NTP服务以在重新启动后更新计算机的日期和时间。
# timedatectl set-ntp 0
# apt-get install ntp
确保在计算机上设置了正确的日期和时间。
# date
2.在Ubuntu Linux上安装MySQL
Zabbix需要一个数据库系统来存储其所有配置。
使用Ubuntu APT命令安装MySQL服务器。
# apt-get update
# apt-get install mysql-server mysql-client
使用以下命令访问MySQL服务控制台。
# mysql -u root -p
在MySQL控制台上,您需要执行以下任务:
•创建名为zabbix的数据库。
•创建名为zabbix的MySQL用户帐户。
•完全控制zabbix数据库到zabbix用户。
CREATE DATABASE zabbix CHARACTER SET UTF8 COLLATE UTF8_BIN;
CREATE USER ‘zabbix’@’%’ IDENTIFIED BY ‘kamisama123’;
GRANT ALL PRIVILEGES ON zabbix.* TO ‘zabbix’@’%’;
quit;
下载Zabbix安装包以获取数据库模板。
# mkdir /downloads
# cd /downloads
# wget https://ufpr.dl.sourceforge.net/project/zabbix/ZABBIX%20Latest%20Stable/4.0.3/zabbix-4.0.3.tar.gz
解压缩Zabbix安装包。
在MySQL数据库中导入Zabbix数据库模板。
当被问到时,您需要输入Zabbix用户的MySQL密码。
# tar -zxvf zabbix-4.0.3.tar.gz
# cd zabbix-4.0.3/database/mysql/
# mysql -u zabbix -p zabbix < schema.sql
# mysql -u zabbix -p zabbix < images.sql
# mysql -u zabbix -p zabbix < data.sql
Zabbix数据库安装完成。
3.在Ubuntu Linux上安装Apache
使用Ubuntu APT命令安装Apache服务器和所需的PHP模块。
# apt-get install apache2 php7.2 php7.2-mysql libapache2-mod-php7.2
# apt-get install php7.2-mbstring php7.2-xml php7.2-gd
# apt-get install php7.2-curl php7.2-bcmath php7.2-ldap
启用Apache mod_ssl。
启用Apache mod_rewrite。
编辑apache2.conf文件。
# a2enmod ssl
# a2enmod rewrite
# vi /etc/apache2/apache2.conf
在apache2.conf的末尾添加以下行
<Directory /var/www/html>
AllowOverride All
</Directory>
在系统上查找PHP配置文件的位置。
编辑php.ini配置文件。
# updatedb
# locate php.ini
# vi /etc/php/7.2/apache2/php.ini
您的PHP版本可能与我们的版本不同。
您的PHP配置文件位置可能与我们的不同。
修改php.ini配置文件中的以下项。
max_execution_time = 300
memory_limit = 256M
post_max_size = 32M
max_input_time = 300
date.timezone = America/Sao_Paulo
您的时区可能与我们的时区不同。
手动重新启动Apache Web服务器。
# service apache2 restart
# service apache2 status
验证Apache服务状态。
● apache2.service – The Apache HTTP Server
Loaded: loaded (/lib/systemd/system/apache2.service; enabled)
Drop-In: /lib/systemd/system/apache2.service.d
└─apache2-systemd.conf
Active: active (running) since Mon 2018-12-03 03:41:12 -02; 2 days ago
Apache服务器安装完成。
4.配置Apache虚拟主机
虚拟主机,如果一个功能允许一个Apache服务器使用相同的IP地址提供多个网站。
让我们创建必要的基础设施来使用Apache VirtualHosts功能。
# mkdir /websites/zabbix -p
# cd /websites/zabbix
# mkdir www logs
# chown www-data.www-data /websites -R
我们的网站名为zabbix.mining-pool.ninja。
zabbix.mining-pool.ninja网站文件应位于/ websites / zabbix / www目录中。
zabbix.mining-pool.ninja日志将存储在/ websites / zabbix / logs目录中。
Alert!
You need to change the configuration files to reflect your Zabbix website name.
在Zabbix网站上创建Apache Virtualhost配置文件。
# vi /etc/apache2/sites-available/zabbix.conf
这是我们配置的文件。
<VirtualHost *:80>
ServerAdmin nobody@care.com
DocumentRoot /websites/zabbix/www
ServerName zabbix.mining-pool.ninja
<Directory /websites/zabbix/www/>
Options Indexes FollowSymLinks
AllowOverride All
Require all granted
</Directory>
ErrorLog /websites/zabbix/logs/error.log
CustomLog /websites/zabbix/logs/access.log combined
LogLevel error
</VirtualHost>
启用Zabbix Virtualhost网站配置文件。
重新启动Apache服务。
# a2ensite zabbix.conf
# service apache2 restart
您完成了Apache VirtualHosts配置。
5.配置DNS域注册表
访问 GODADDY 并购买DNS域名。
在我们的示例中,我们购买了名为MINING-POOL.NINJA的域名。
您可以使用任何网站购买DNS域名,GoDaddy只是我个人的选择。
创建一个DNS条目,将Zabbix网站指向运行Apache的计算机。
在我们的示例中,我们创建了一个DNS条目,将ZABBIX.MINING-POOL.NINJA指向IP地址34.217.177.160。

使用NSLOOKUP命令测试DNS配置
# apt-get update
# apt-get install dnsutils
# nslookup zabbix.mining-pool.ninja
Non-authoritative answer:
Name: zabbix.mining-pool.ninja
Address: 34.217.177.160
您完成了DNS域配置。
打开浏览器并尝试访问您网站的HTTP版本。
在我们的示例中,在浏览器中输入了以下URL:
•http://zabbix.mining-pool.ninja
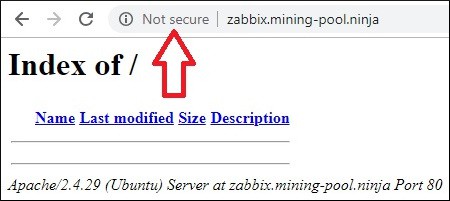
现在,我们需要安装免费的HTTPS证书。
我们还需要自动将所有HTTP流量重定向到我们的Zabbix网站的HTTPS版本。
6.在Apache上配置免费HTTPS证书
安装所需的软件包以在Ubuntu Linux上使用LET’S ENCRYPT免费SSL / TLS证书。
# apt-get install software-properties-common
# add-apt-repository universe
# add-apt-repository ppa:certbot/certbot
# apt-get update
# apt-get install python-certbot-apache
请求并安装Apache免费HTTPS证书。
# certbot –apache -d mining-pool.ninja
•按(A)同意服务条款。
•按(Y)分享您的电子邮件并接收简报。
•按(2)自动将HTTP网站重定向到HTTPS版本。
Saving debug log to /var/log/letsencrypt/letsencrypt.log
Plugins selected: Authenticator apache, Installer apache
Enter email address (used for urgent renewal and security notices) (Enter ‘c’ to
cancel): techexpert.tips@gmail.com
– – – – – – – – – – – – – – – – – – – – – – – – – – – – – – – – – – – – – – – –
Please read the Terms of Service at
https://letsencrypt.org/documents/LE-SA-v1.2-November-15-2017.pdf. You must
agree in order to register with the ACME server at
https://acme-v02.api.letsencrypt.org/directory
– – – – – – – – – – – – – – – – – – – – – – – – – – – – – – – – – – – – – – – –
(A)gree/(C)ancel: A
– – – – – – – – – – – – – – – – – – – – – – – – – – – – – – – – – – – – – – – –
Would you be willing to share your email address with the Electronic Frontier
Foundation, a founding partner of the Let’s Encrypt project and the non-profit
organization that develops Certbot? We’d like to send you email about our work
encrypting the web, EFF news, campaigns, and ways to support digital freedom.
– – – – – – – – – – – – – – – – – – – – – – – – – – – – – – – – – – – – – – – –
(Y)es/(N)o: Y
Obtaining a new certificate
Performing the following challenges:
http-01 challenge for zabbix.mining-pool.ninja
Enabled Apache rewrite module
Waiting for verification…
Cleaning up challenges
Created an SSL vhost at /etc/apache2/sites-available/zabbix-le-ssl.conf
Enabled Apache socache_shmcb module
Enabled Apache ssl module
Deploying Certificate to VirtualHost /etc/apache2/sites-available/zabbix-le-ssl.conf
Enabling available site: /etc/apache2/sites-available/zabbix-le-ssl.conf
Please choose whether or not to redirect HTTP traffic to HTTPS, removing HTTP access.
– – – – – – – – – – – – – – – – – – – – – – – – – – – – – – – – – – – – – – – –
1: No redirect – Make no further changes to the webserver configuration.
2: Redirect – Make all requests redirect to secure HTTPS access. Choose this for
new sites, or if you’re confident your site works on HTTPS. You can undo this
change by editing your web server’s configuration.
– – – – – – – – – – – – – – – – – – – – – – – – – – – – – – – – – – – – – – – –
Select the appropriate number [1-2] then [enter] (press ‘c’ to cancel): 2
Enabled Apache rewrite module
Redirecting vhost in /etc/apache2/sites-enabled/zabbix.conf to ssl vhost in /etc/apache2/sites-available/zabbix-le-ssl.conf
– – – – – – – – – – – – – – – – – – – – – – – – – – – – – – – – – – – – – – – –
Congratulations! You have successfully enabled https://zabbix.mining-pool.ninja
You should test your configuration at:
https://www.ssllabs.com/ssltest/analyze.html?d=zabbix.mining-pool.ninja
– – – – – – – – – – – – – – – – – – – – – – – – – – – – – – – – – – – – – – – –
IMPORTANT NOTES:
– Congratulations! Your certificate and chain have been saved at:
/etc/letsencrypt/live/zabbix.mining-pool.ninja/fullchain.pem
Your key file has been saved at:
/etc/letsencrypt/live/zabbix.mining-pool.ninja/privkey.pem
Your cert will expire on 2019-04-09. To obtain a new or tweaked
version of this certificate in the future, simply run certbot again
with the “certonly” option. To non-interactively renew *all* of
your certificates, run “certbot renew”
– If you like Certbot, please consider supporting our work by:
Donating to ISRG / Let’s Encrypt: https://letsencrypt.org/donate
Donating to EFF: https://eff.org/donate-le
系统将自动请求免费证书。
它还将配置您的Apache Web服务器,以将所有HTTP访问重定向到您的网站的HTTPS版本。
在我们的示例中,系统创建了名为zabbix-le-ssl.conf的HTTPS Virtualhost配置文件。
以下是HTTPS Virtualhost配置文件zabbix-le-ssl.conf的内容:
<IfModule mod_ssl.c>
<VirtualHost *:443>
ServerAdmin nobody@care.com
DocumentRoot /websites/zabbix/www
ServerName zabbix.mining-pool.ninja
<Directory /websites/zabbix/www/>
Options Indexes FollowSymLinks
AllowOverride All
Require all granted
</Directory>
ErrorLog /websites/zabbix/logs/error.log
CustomLog /websites/zabbix/logs/access.log combined
LogLevel error
SSLCertificateFile /etc/letsencrypt/live/zabbix.mining-pool.ninja/fullchain.pem
SSLCertificateKeyFile /etc/letsencrypt/live/zabbix.mining-pool.ninja/privkey.pem
Include /etc/letsencrypt/options-ssl-apache.conf
</VirtualHost>
</IfModule>
KEY文件包含您的证书私钥,必须始终保存在安全的地方。
mining-pool.ninja的密钥文件存储在/etc/letsencrypt/live/zabbix.mining-pool.ninja/privkey.pem中。
系统会自动修改原始Apache Virtualhost配置文件。
它会自动将所有HTTP请求重定向到您网站的HTTPS版本。
以下是更新的原始HTTP Virtualhost配置文件zabbix.conf的内容:
<VirtualHost *:80>
ServerAdmin nobody@care.com
DocumentRoot /websites/zabbix/www
ServerName zabbix.mining-pool.ninja
<Directory /websites/zabbix/www/>
Options Indexes FollowSymLinks
AllowOverride All
Require all granted
</Directory>
ErrorLog /websites/zabbix/logs/error.log
CustomLog /websites/zabbix/logs/access.log combined
LogLevel error
RewriteEngine on
RewriteCond %{SERVER_NAME} =zabbix.mining-pool.ninja
RewriteRule ^ https://%{SERVER_NAME}%{REQUEST_URI} [END,NE,R=permanent]
</VirtualHost>
7.在Apache上测试免费HTTPS证书
完成所有配置。
是时候测试你的配置了。
打开浏览器并尝试访问您网站的HTTP版本。
在我们的示例中,在浏览器中输入了以下URL:
•http://zabbix.mining-pool.ninja
Apache会自动将HTTP请求重定向到您网站的HTTPS版本。
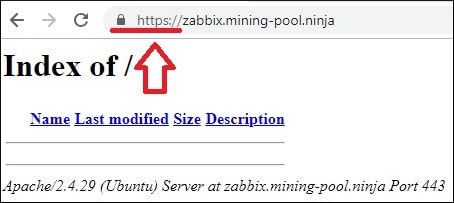
您完成了Apache HTTPS免费证书配置。
8.在Ubuntu Linux上安装Zabbix 4
完成MySQL和Apache配置后,我们可以启动Zabbix安装。
为Zabbix服务创建所需的用户帐户。
# groupadd zabbix
# useradd -g zabbix -s /bin/bash zabbix
使用Ubuntu APT命令安装所需的软件包。
# apt-get install build-essential libmysqlclient-dev libssl-dev libsnmp-dev libevent-dev
# apt-get install libopenipmi-dev libcurl4-openssl-dev libxml2-dev libssh2-1-dev libpcre3-dev
# apt-get install libldap2-dev libiksemel-dev libcurl4-openssl-dev libgnutls28-dev
访问下载Zabbix安装包的目录。
编译并安装Zabbix服务器应用程序。
# cd /downloads/zabbix-4.0.3/
# ./configure –enable-server –enable-agent –with-mysql –with-openssl –with-net-snmp –with-openipmi –with-libcurl –with-libxml2 –with-ssh2 –with-ldap
# make
# make install
在系统上查找Zabbix服务器配置文件的位置。
编辑zabbix_server.conf配置文件。
# updatedb
# locate zabbix_server.conf
# vi /usr/local/etc/zabbix_server.conf
在配置之前,这是原始文件。
LogFile=/tmp/zabbix_server.log
DBName=zabbix
DBUser=zabbix
Timeout=4
LogSlowQueries=3000
这是我们配置的新文件。
LogFile=/tmp/zabbix_server.log
DBHost=localhost
DBName=zabbix
DBUser=zabbix
DBPassword=kamisama123
Timeout=4
LogSlowQueries=3000
使用以下命令启动Zabbix服务器。
# /usr/local/sbin/zabbix_server
使用以下命令启动Zabbix代理应用程序。
# /usr/local/sbin/zabbix_agentd
可选的! Zabbix安装包提供服务启动脚本。
复制Zabbix启动脚本。
# cd /downloads/zabbix-4.0.3/
# cp misc/init.d/debian/* /etc/init.d/
您现在可以使用以下命令启动Zabbix服务器服务。
# /etc/init.d/zabbix-server start
您现在可以使用以下命令来停止Zabbix服务器服务。
# /etc/init.d/zabbix-server stop
将Zabbix前端文件移动到Apache根驱动器目录中。
让www-data用户完全控制Zabbix目录及其文件。
# cd /downloads/zabbix-4.0.3/frontends
# cp php/* /websites/zabbix/www/ -R
# chown www-data.www-data /websites/zabbix/www -R
重新启动Apache服务。
# service apache2 stop
# service apache2 start
9.在Ubuntu Linux上配置Zabbix
打开浏览器并访问Zabbix网站的HTTPS版本。
在我们的示例中,在浏览器中输入了以下URL:
•https://zabbix.mining-pool.ninja
将显示Zabbix安装向导。
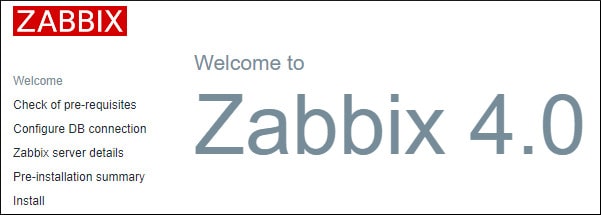
验证是否成功满足所有Zabbix要求。
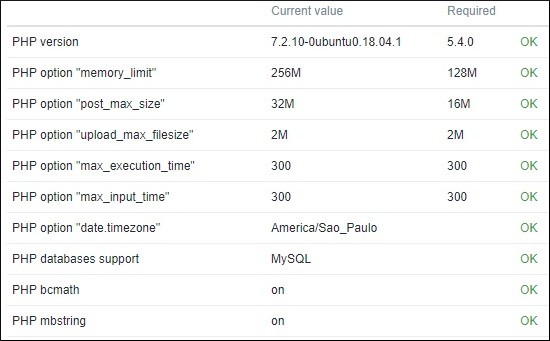
输入连接Zabbix数据库所需的MySQL登录信息
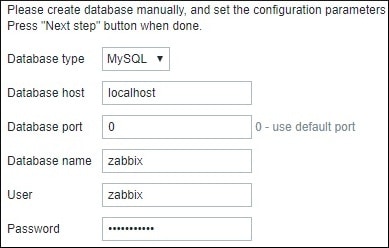
单击“下一步”按钮。

验证Zabbix安装摘要。
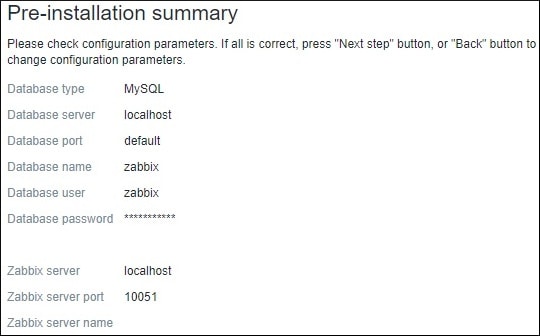
单击完成按钮以访问Zabbix登录屏幕。

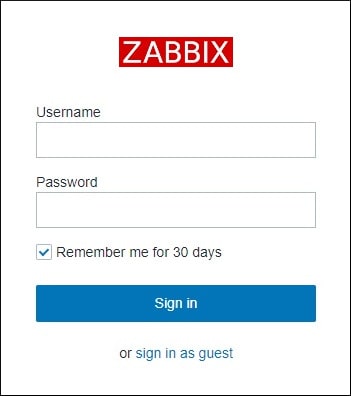
在Zabbix登录屏幕上,输入以下信息。
•Zabbix默认用户名:Admin
•Zabbix默认密码:zabbix
成功登录后,将显示Zabbix仪表板。
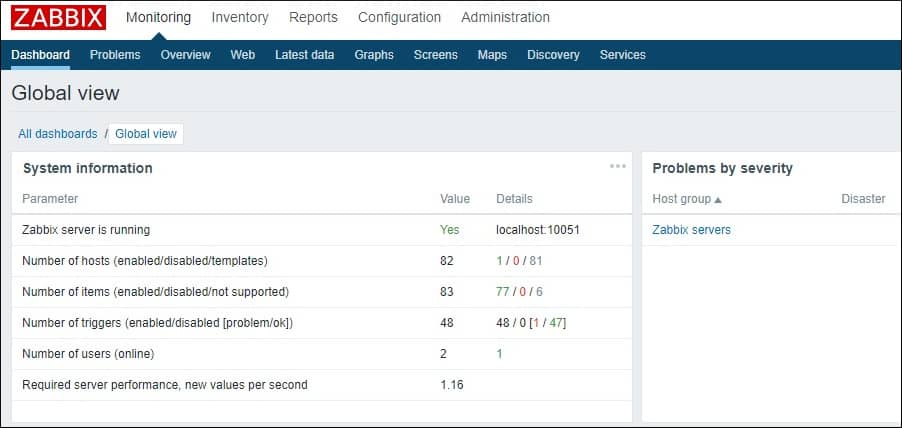
恭喜,Zabbix已安装在您的系统上。
10.监控Zabbix服务器
Zabbix服务器必须能够自我监控。
在Zabbix仪表板上,访问“配置”菜单并选择“主机”选项。

在屏幕的右上角,选择名为:Zabbix servers的选项
找到名为Zabbix server的主机,然后单击DISABLED一词。
这将使Zabbix服务器能够自我监控。

Zabbix服务器状态将从DISABLED变为ENABLED。

Zabbix服务器现在正在监控自己。
11.如何续订免费HTTPS证书
LET’S ENCRYPT免费SSL / TLS证书仅在90天内有效。
系统会创建一个计划任务,以在到期后的三十天内自动续订任何证书。
计划的任务名称是certbot,它位于目录/etc/cron.d中。
这是/etc/cron.d/certbot文件的内容:
# /etc/cron.d/certbot: crontab entries for the certbot package
#
# Upstream recommends attempting renewal twice a day
#
# Eventually, this will be an opportunity to validate certificates
# haven’t been revoked, etc. Renewal will only occur if expiration
# is within 30 days.
#
# Important Note! This cronjob will NOT be executed if you are
# running systemd as your init system. If you are running systemd,
# the cronjob.timer function takes precedence over this cronjob. For
# more details, see the systemd.timer manpage, or use systemctl show
# certbot.timer.
SHELL=/bin/sh
PATH=/usr/local/sbin:/usr/local/bin:/sbin:/bin:/usr/sbin:/usr/bin
0 */12 * * * root test -x /usr/bin/certbot -a \! -d /run/systemd/system && perl -e ‘sleep int(rand(43200))’ && certbot -q renew
使用以下命令模拟证书续订过程。
# certbot renew –dry-run
您应该看到以下消息:
Saving debug log to /var/log/letsencrypt/letsencrypt.log
– – – – – – – – – – – – – – – – – – – – – – – – – – – – – – – – – – – – – – – –
Processing /etc/letsencrypt/renewal/zabbix.mining-pool.ninja.conf
– – – – – – – – – – – – – – – – – – – – – – – – – – – – – – – – – – – – – – – –
Cert not due for renewal, but simulating renewal for dry run
Plugins selected: Authenticator apache, Installer apache
Renewing an existing certificate
Performing the following challenges:
http-01 challenge for zabbix.mining-pool.ninja
Waiting for verification…
Cleaning up challenges
– – – – – – – – – – – – – – – – – – – – – – – – – – – – – – – – – – – – – – – –
new certificate deployed with reload of apache server; fullchain is
/etc/letsencrypt/live/zabbix.mining-pool.ninja/fullchain.pem
– – – – – – – – – – – – – – – – – – – – – – – – – – – – – – – – – – – – – – – –
– – – – – – – – – – – – – – – – – – – – – – – – – – – – – – – – – – – – – – – –
** DRY RUN: simulating ‘certbot renew’ close to cert expiry
** (The test certificates below have not been saved.)
Congratulations, all renewals succeeded. The following certs have been renewed:
/etc/letsencrypt/live/zabbix.mining-pool.ninja/fullchain.pem (success)
** DRY RUN: simulating ‘certbot renew’ close to cert expiry
** (The test certificates above have not been saved.)
– – – – – – – – – – – – – – – – – – – – – – – – – – – – – – – – – – – – – – – –
IMPORTANT NOTES:
– Your account credentials have been saved in your Certbot
configuration directory at /etc/letsencrypt. You should make a
secure backup of this folder now. This configuration directory will
also contain certificates and private keys obtained by Certbot so
making regular backups of this folder is ideal.

Leave A Comment
You must be logged in to post a comment.